Library

Choosing a fountain basin isn't as tricky as you'd think. It's all based on the fountain that you like and where you're going to put it. We'll run through an example of our fountains and how we'd decide which basin to pair it with. We've even included a fun infographic....

How to Choose a Basin for a Recirculating Fountain

Choosing a fountain basin isn't as tricky as you'd think.

It's all based on the fountain that you like and where you're going to put it.
We'll run through an example of our fountains and how we'd decide which basin to pair it with. We've even included a fun infographic.
Our first example is the Small Antique Millstone Fountain.
These fountains are about 20" in diameter and weigh approximately 150 pounds. Here's a basic checklist as shown in our infographic below.

1. How big is your fountain?

    Most fountains need a basin that's 16-24" larger than the fountain's widest measurement.

    Our example fountain is 20" in diameter, so 36" is the smallest basin size you'd want to put this fountain on. 

    Keep in mind that splash patterns can vary quite a bit based on the shape and style of the fountain. Rounder fountains with low plume tend to "hug" the fountain and can use smaller basins to recapture the water. Fountains with rough edges or cuts can throw water and will create much more splash (and noise). 

    2. How much does it weigh?

     Most preformed plastic basins have weight limits less than 2000 pounds. Heavier fountains require basins made with pond liner, galvanized grating, and concrete blocks. 
    Good thing this one only weighs 150 pounds. We can use a preformed plastic basin. They are more expensive but you certainly save in installation time and cost.
    Some locations may require fountains we sell may require a concrete pad or footer below the basin to reduce settling over time. Landscape contractors in your area will know local soil conditions and whether it would be necessary.

    3. Commercial or Residential? 

    Commercial installations generally use pour on site concrete basins that are not much different than swimming pools. They require skilled contractors to build.
    While all of our fountains are suited to commercial applications, in this example we'll pretend this is going in our back yard. No need for skilled contractors today!

    4. Above ground or below? 

    Many traditional fountains are in above ground pools. Today, most residential fountains use dissapearing basins that are buried and covered with decorative rock. Choose based on style preferences and where you want your fountain located.
    In our example, we could use the 36" Round Installation Kit if we wanted to have a dissapearing basin. If instead we wanted our fountain on a concrete or paved patio, we could use an above ground basin such as the Patio Basin.


    choosing a basin for a recirculating water fountain

        Let’s get to know Linda Weston. A true balance of tenacious and tender, outspoken and refined, and all-around leading lady: this office "Mama Bear" preserves and upholds the collection of Stone Forest product on a daily basis in her firm management of receivables and returns (not an easy...

    Profile Spotlight | Linda Weston


    Let’s get to know Linda Weston. A true balance of tenacious and tender, outspoken and refined, and all-around leading lady: this office "Mama Bear" preserves and upholds the collection of Stone Forest product on a daily basis in her firm management of receivables and returns (not an easy job, folks!). But her unwavering sense of humor and contagious laugh keep even the most difficult scenarios amendable. She has a tendency to "tell it like it is", and is a valuable "go-to" for team answers and problem-solving because of her longstanding experience and extensive product knowledge. If you're lucky enough to catch her on the phone, you'll see what I mean! You go, girl.

    What’s your position at Stone Forest, and when did you start working here? Accounts Receivable, Returns Manager & Mailroom Supervisor. Since it's a small company, we all work in customer service and sales too. In this busy environment, you need to have a big head to wear all of these hats!  I have been here for 9 years.

    Which Stone Forest Kitchen & Bath material gets you really jazzed up, and why? I really really love our onyx, it's so unique! Especially the purple onyx.

    And your favorite Garden product? I love the Pebble Collection (fountains and seats). We also have a new stone material for our fountains that is really beautiful (bamboo pattern in a grayish stone). Do I have to narrow it down? We have so many great products!


    Hometown: I was born in Santa Monica, California, but I have lived in Santa Fe since I was 9 years old. This is home.​

    Alma mater: Santa Fe High School. Go Demons!​ (not the best mascot in the world...)​

    Childhood hero: When I was young my copy of The Hiding Place by Corrie ten Boom was very worn. Anyone who goes out of their way to help others is my hero.​

    Favorite activities: I'm just starting to have a life again! My kids have grown up.

    ​Musicians I love​Elvis Costello, Rory Block, Sonia Dada​...this list could go on for a long long time but those are the ones that immediately come to mind.

    Signature cocktail: Gin & Tonic, especially in the summer​.

    Last meal on earth: Huevos Rancheros with red chile. Or maybe pizza​.

    Best book I've read in a long long time:​  Outlander by Diana Gabaldon. I haven't seen all of the TV episodes yet, but the book series is so so good.

    Favorite place you’d like to go back to: I went to school in Santa Cruz for a short while, and it has such a nice campus and lovely location I'd like to go back.

    If you could travel anywhere in the world, you would choose to explore: Old European castles have always fascinated me!.

    Why Santa Fe? I had no choice when I was 9 years old and even though I have left a few times for college I keep coming back because of the natural beauty. It really is a special place here. If you have ever been to northern New Mexico, you know what I'm talking about.

    Why is working at Stone Forest so awesome? Besides the great products we offer, it is the people that make this place so incredible​.

    I’m known for: My smile. When I was about 11 years old I read that it takes more muscles to frown than to smile and basically I'm just lazy (I'm not making this up!) That fact and the money my parents spent on braces make me smile more than frown.

    :)

    Photo by: Serquis & Associates Landscape Architecture   As the seasons change and the buds of spring begin showing, maintenance of our gardens and fountains are at the top of our to-do lists. With the most basic of maintenance tasks your fountain will run beautifully all season.   We've broken the...

    Stone Forest How-To │ Fountain Maintenance

    Photo by: Serquis & Associates Landscape Architecture


    As the seasons change and the buds of spring begin showing, maintenance of our gardens and fountains are at the top of our to-do lists. With the most basic of maintenance tasks your fountain will run beautifully all season.


    We've broken the checklist into yearly and weekly or regular maintenance below:


    Weekly or Regularly

    • Check to make sure the basin has enough water. Fountain pumps will "speak" to you when the water is running low. Another sign of low water levels is small air bubbles forming at the top of the fountain. It means that your pump is sucking in air and not water. As a general rule, most of our fountains lose 2 gallons of water a week to evaporation in our Santa Fe, New Mexico climate.
    • Check that there isn't debris accumulating on rocks around your fountain. As debris breaks down, it easily falls down into the reservoir where it can clog your pump and shorten its lifespan.
    •  Add water treatment chemicals as necessary. We offer two wildlife safe products for preventative water treatment, one for algae and another for mineral deposits in the water (hard water). Follow manufacturer’s instructions on amount and frequency of use on each of these products.


      Annually

      • If your fountain needs cleaning, unplug or turn off the pump. Take a stiff brush and some soapy water and clean all of the surfaces. Polished surfaces can be scraped (carefully) with a razor blade to remove any stuck-on calcium or minerals. On rougher areas you can use a wire brush to remove calcium that's hardened to the stone.
      • If sediment has built up in your fountain basin, you can use a wet/ dry shop vacuum to clear out sediment and remaining water. Rinse the basin once more and refill. Plug your pump back in and you’re ready to enjoy! We'd recommend doing this at least once yearly.   
      • If you plan to run your pump through the winter just be sure the entire basin doesn't freeze. You can read our full guide on winterizing your fountain here.


        You can download these instructions in PDF format here.

        So, how do these fountains work anyways? When you’re wandering through our gallery, it seems like the water just appears and disappears so seamlessly… There are many different ways to display a running water feature. Here at Stone Forest, we provide all the components you need for a simple, recirculating...

        Stone Forest How-To | Fountain Installation

        So, how do these fountains work anyways? When you’re wandering through our gallery, it seems like the water just appears and disappears so seamlessly…

        There are many different ways to display a running water feature. Here at Stone Forest, we provide all the components you need for a simple, recirculating set-up. Let’s take a closer look at how this works:

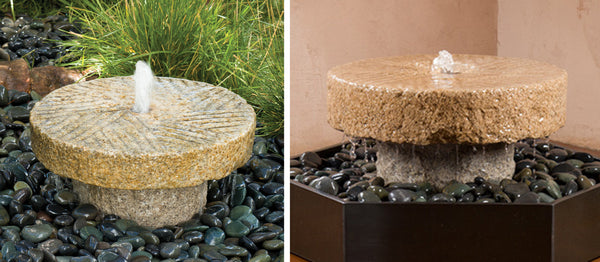
        Step one | Choose your fountain design Which one is your favorite? Did the Helix catch your eye? Or how about the Natural Millstone Fountain, Swirl Fountain or one of the new Pebble Fountains? Yep, many people find that this is the hardest part of the decision because there are just so many to choose from!

        Step Two | Accessories After you narrow it down to the fountain you want, the accessories we recommend are geared toward the size, shape, and weight of the design you choose. There are 3 basic components we provide that complete the setup: reservoir basin kit (holds the water under the fountain, think of this as a big hidden pool), submersible pump (plugs into electrical nearby and pushes the water up through the fountain, connected to flexible hosing ), and pebbles (hides the reservoir underneath for a seamless, “disappearing” effect):

        We have 5 different reservoir kits that fit the majority of our fountain designs, and 6 pump sizes.  How do you know what you need?  When you’re looking at a particular fountain on our website, all of the related accessories are listed and linked directly on the same page so you can see what we recommend.  In general, there are 2 types of kits you can use: a rigid plastic basin, or an assembly of wood framing, pond liner, concrete, and metal grating.  Each of these basins functions in the same way, but some work better than others with the particular fountain you select.

        I’m going to explain how each of these designs goes into the ground.

        The first step to any of these installations is to find a nice spot in your yard where you’d like to showcase your snazzy new Stone Forest water feature.  You’ll be digging a hole into the dirt in this area, so make sure it’s not a hard surface like a patio or concrete pad (unless you love jack-hammering!), or an extremely root-ridden area right next to an ancient, gnarly tree.  (If you aren’t using a Stone Forest installation kit, then see “Custom Installations” toward the bottom of this post).


        STEP-BY-STEP INSTALLATION FOR EACH OF OUR KITS:

        We offer 2 installation kit designs that are made of a heavy-duty, durable plastic with components that neatly “snap” together to make your reservoir basin.

        1. Fountain Installation Kit, 36" Round Basin,
        36″ diam. x 10″H, holds 35 gallons of water & up to 2000 lbs of weight

        Click here to view the PDF version of the step-by-step instructions below.

        You can view additional images here on our website showing this basin's components: use the arrows to flip through the full slideshow. This is a nice visual guide alongside these instructions.

        For a visual guide, see the installation example below these instructions.


        • Get your shovel and level out. Dig a hole 9″ deep, 30″ in diameter at the bottom, and sloping to 35″ in diameter at the top. Ensure that the ground at the bottom is level and solid (we used play sand from the hardware store in the bottom of the hole to create a nice “level” surface).

        • Place the basin into the hole, with the power cord cut-out facing toward the power source. Level, moving earth or sand around if necessary.

        • Set the round support “trunk” into the circular receptacle in the center of the basin and align the tubing cut-outs.

        • Place the pump into the basin, running the power cord through the cord cut-out.

        • Cut a length of tubing long enough to reach from the bottom of the basin to the top of the water feature. Run the tubing through the center hole in the top of the support and out the tubing cut-outs, then connect it to the pump outlet fitting.

        • Install the 6 top plates.

        • Place your Stone Forest water feature on top of the basin in the center, on the section of the support “trunk” that’s slightly higher than the plates.

        • Pull the hosing up through the center cord-drilled hole in the fountain stone. You’ll notice that there is space left around the 1.25″ drilled hole and the either 1/2″ or 5/8″ diameter flexible garden hose that connects to your pump below. To fill the space around the hose and fit it snugly into the top of the core-drilled hole, we wrap the top part of the hose with a strip of pond liner and electrical tape. See images below for reference:

        • Cover the reservoir with smooth river pebbles (or whatever you choose to use to conceal the basin). For this kit, we usually recommend Qty (6) 75-lb bags of the dark river pebbles.

        • Fill your reservoir with water, plug the pump in, and VOILA! Grab a lounge chair and prepare to be relaxed by the soothing sounds of your new fountain.


        INSTALLATION EXAMPLE:

        View PDF, 36" Round Kit Basin with Rough Vessel step-by-step

        You can view additional images by clicking on the link above, showing an example of the Stone Forest Rough Basin being installed at a private residence in New Mexico using the 36" Round Kit, pump, and pebbles. This is a nice visual guide alongside these instructions. 

        Here's a video showing the fountain installed and running:


        2. Fountain Installation Kit, 44" Square Basin, 
        44" square x 11″H, holds 60 gallons of water & up to 3000 lbs of weight

        Click here to view the PDF version of the step-by-step instructions below.

        You can view additional images here on our website showing this basin's components and installation: use the arrows to flip through the full slideshow. This is a nice visual guide alongside these instructions.


        • Get your shovel and level out. Dig a hole 10″ deep, 29″ square at the bottom, and sloping to 37″ square at the top. Ensure that the ground at the bottom is level and solid (we used play sand from the hardware store in the bottom of the hole to create a nice “level” surface).

        • Place the basin into the hole, with the power cord cut-out facing toward the power source. Level, moving earth or sand around if necessary.

        • Insert the 8 supports into the 8 support holes.

        • Place the center plate (gray) onto the supports, pressing firmly to ensure full installation.

        • Cut a length of tubing long enough to reach from the bottom of the basin to the top of the water feature. Run the tubing through the center hole in the top of the center plate and connect it to the pump outlet fitting.

        • Install the 4 top plates. On the side nearest the power supply, run the pump power cord out the cord gap, under the edge of the top plate, and through the cord cut-out.

        • Install the 4 access covers, ensuring that the cut-out in each faces outward.

        • Place your Stone Forest water feature on top of the basin in the center, where the 4 top plates meet.

        • Pull the hosing up through the center cord-drilled hole in the fountain stone. You’ll notice that there is space left around the 1.25″ drilled hole and the either 1/2″ or 5/8″ diameter flexible garden hose that connects to your pump below. To fill the space around the hose and fit it snugly into the top of the core-drilled hole, we wrap the top part of the hose with a strip of pond liner and electrical tape. See images below for reference:

        • Cover the reservoir with smooth river pebbles (or whatever you choose to use to conceal the basin). For this kit, we usually recommend Qty (6) 75-lb bags of the dark river pebbles.

        • Fill your reservoir with water, plug the pump in, and VOILA! Grab a lounge chair and prepare to be relaxed by the soothing sounds of your new fountain.


        ___________________________________

        We offer 3 installation kit designs that are made by combining components of wood, concrete, pond liner, and galvanized grating together to make your reservoir basin.

        3. Fountain Installation Kit, 4×4′ - We no longer manufacture this kit, but it is an example of one you can make.


        48" square x 12"H, holds approx 100 gallons of water

        Click here to view the PDF version of the step-by-step instructions below.

        You can view additional images here on our website showing this basin's 

        • Get your shovel and level out. Dig a hole 12″ deep, 48″ square. Ensure that the ground at the bottom is level and solid (you can use play sand from the hardware store in the bottom of the hole to create a nice “level” surface). 

        • Place the 4 pieces of 2x6 lumber provided into the sides of the hole, standing up like walls, leaving 1" standing above grade. Level, moving earth or sand around if necessary.

        • Center the concrete pedestal and level. If there is a piece of wood running through the center of the pedestal, pop this out. Having the empty groove running down the middle is necessary for the hosing connection. If there is wood framing the sides, it's ok to leave this on.

        • Unfold the pond liner, and spread it into the hole, running over top of the concrete pedestal, and down into the space around it. Helpful hint: place some kind of padding between the concrete pedestal and pond liner to prevent tearing/leaking. You could use excess pond liner, felt, or even newspaper to create a nice barrier. The weight of the water will want to pull the pond liner down on those corners, so this should help prevent future issues.

        • Filling the reservoir with water at this step can help pull the pond liner down into place, so that you can staple the outer edges to the exterior 1" of wood frame all the way around, and then snip excess liner off neatly. If you don't want to add water yet, push the liner down into the hole as best you can before cutting excess so you don't run short.

        • Place the galvanized grating over the hole. The edges should line up with the framing, and the cutout in the middle should line up with the groove in the top of the pedestal. This will accommodate your hosing, so it's important that the pond liner is pushed into the groove as much as possible.

        • Place your Stone Forest water feature on top of the pedestal in the center.

        • Cut a length of tubing long enough to reach from the bottom of the basin to the top of the water feature. Run the tubing through the center hole in the fountain, snaking out the bottom through the concrete pedestal's center groove, and out the side. Connect it to the pump outlet fitting. The pump should sit below the corner cut-out for easy access at anytime. There should be an extra square of galvanized grating that will act as the cover for this pump access (and prevent the pebbles from falling through).

        • You’ll notice that there is space left around the 1.25″ drilled hole and the either 1/2″ or 5/8″ diameter flexible garden hose that connects to your pump below. To fill the space around the hose and fit it snugly into the top of the core-drilled hole, we wrap the top part of the hose with a strip of pond liner and electrical tape. See images below for reference:

        • It's best if this pump access corner is on the side nearest the power supply. Run the pump power cord out the side, under the edge of the grating. Hide or bury as necessary (or as advised by your electrician). 

        • Cover the pump access area with the extra square of grating. Cover the reservoir with smooth river pebbles (or whatever you choose to use to conceal the basin). For this kit, we usually recommend Qty (6) 75-lb bags of the dark river pebbles.

        • Fill your reservoir with water, plug the pump in, and VOILA! Grab a lounge chair and prepare to be relaxed by the soothing sounds of your new fountain.


        4. Fountain Installation Kit, 6x6′ - We no longer manufacture this kit, but it is an example of one you can make.
        72" square x 12"H, holds approx 250 gallons of water

        Click here to view the PDF version of the step-by-step instructions below. 

        • Get your shovel and level out. Dig a hole 12” deep, 72” square. Ensure that the ground at the bottom is level and solid (you can use play sand from the hardware store in the bottom of the hole to create a nice “level” surface). 

        • Place the 4 pieces of 2x6 lumber provided into the sides of the hole, standing up like walls, leaving 1” standing above grade. Level, moving earth or sand around if necessary.

        • Center the concrete pedestal and level. If there is a piece of wood running through the center of the pedestal, pop this out. Having the empty groove running down the middle is necessary for the hosing connection. If there is wood framing the sides, it’s ok to leave this on.

        • Unfold the pond liner, and spread it into the hole, running over top of the concrete pedestal, and down into the space around it. Helpful hint: place some kind of padding between the concrete pedestal and pond liner to prevent tearing/leaking. You could use excess pond liner, felt, or even newspaper to create a nice barrier. The weight of the water will want to pull the pond liner down on those corners, so this should help prevent future issues.

        • Filling the reservoir with water at this step can help pull the pond liner down into place, so that you can staple the outer edges to the exterior 1” of wood frame all the way around, and then snip excess liner off neatly. If you don’t want to add water yet, push the liner down into the hole as best you can before cutting excess so you don’t run short.

        • Place the galvanized grating over the hole. Note: there will be Qty (2) 4’ x 6’ sheets that will overlap to create the 6x6’ square. The edges should line up with the framing, and the cutout in the middle should line up with the groove in the top of the pedestal. This will accommodate your hosing, so it’s important that the pond liner is pushed into the groove as much as possible.

        • Place your Stone Forest water feature on top of the pedestal in the center.

        • Cut a length of tubing long enough to reach from the bottom of the basin to the top of the water feature. Run the tubing through the center hole in the fountain, snaking out the bottom through the concrete pedestal’s center groove, and out the side. Connect it to the pump outlet fitting. The pump should sit below the corner cut-out for easy access at anytime. There should be an extra square of galvanized grating that will act as the cover for this pump access (and prevent the pebbles from falling through).

        • You’ll notice that there is space left around the 1.25” drilled hole and the either 1/2” or 5/8” diameter flexible garden hose that connects to your pump below. To fill the space around the hose and fit it snugly into the top of the core-drilled hole, we wrap the top part of the hose with a strip of pond liner and electrical tape. See images below for reference:


        •It’s best if this pump access corner is on the side nearest the power supply. Run the pump power cord out the side, under the edge of the grating. Hide or bury as necessary (or as advised by your electrician). 

        • Cover the pump access area with the extra square of grating. Cover the reservoir with smooth river pebbles (or whatever you choose to use to conceal the basin). For this kit, we usually recommend Qty (11) 75-lb bags of the dark river pebbles.

        • Fill your reservoir with water, plug the pump in, and VOILA! Grab a lounge chair and prepare to be relaxed by the soothing sounds of your new fountain.


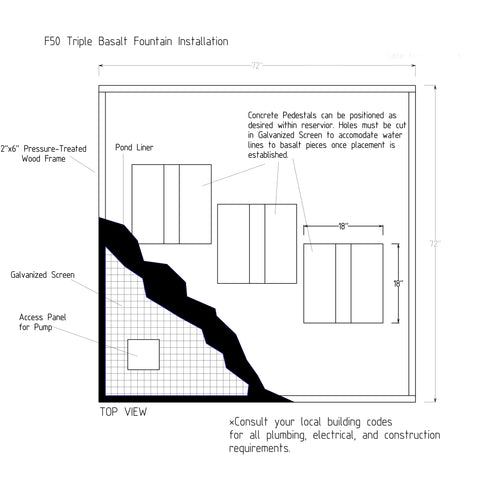
        5. Installation Kit for the 39" Triple Basalt Fountain - We no longer manufacture this kit, but it is an example of one you can make.


        72" square x 12"H, holds approx 220 gallons of water


        Click here to view the PDF version of the step-by-step instructions below. 

        • Get your shovel and level out. Dig a hole 12” deep, 72” square. Ensure that the ground at the bottom is level and solid (you can use play sand from the hardware store in the bottom of the hole to create a nice “level” surface). 

        • Place the 4 pieces of 2x6’ lumber provided into the sides of the hole, standing up like walls, leaving 1” standing above grade. Level, moving earth or sand around if necessary.

        • Unfold the pond liner, and spread it down into the hole and up over the sides. 

        • Center the concrete pedestals in a row (or arrange as you wish). If there is a piece of wood running through the center of the pedestals, pop these out. Having the empty groove running down the middle is necessary for the hosing connections. If there is wood framing the sides, it’s ok to leave this on.

        Helpful hint: place some kind of padding between the concrete pedestals and pond liner to prevent tearing/leaking. You could use excess pond liner underneath the edges/corners for additional protection. Keep in mind that the concrete will be exposed to the water, so you may consider waterproofing your concrete pedestals ahead of time with a waterproofing agent. We like CIM’s products: http://cimindustries.com/wp-content/uploads/2013/05/Waterproofing-Guide-Fountains.pdf

        • Staple the outer edges to the exterior 1” of wood frame all the way around, and then snip excess liner off neatly. If you don’t want to add water yet, push the liner down into the hole as best you can before cutting excess so you don’t run short.

        • Place the galvanized grating over the hole. Note: there will be Qty (2) 4’ x 6’ sheets that will overlap to create the 6x6’ square. The edges should line up with the framing, and you’ll need to mark and make cuts over the centers of each pedestal. You can use a power tool like an angle grinder to make the cuts, but please be careful! Safety gear should be worn, and having a friend present to stabilize (and supervise?) is probably wise! 

        Once the cuts are made and you have aligned the grating over each pedestal, make sure that the pond liner is pushed down into each concrete pedestal groove: this will accommodate your hosing. You’ll also want to cut a pump access hole in one of the corners closest to your power supply. This hole should be slightly smaller than the ones you just cut for the hose access, since one of these extra pieces will become the “trap door” cover for the pump access hole.

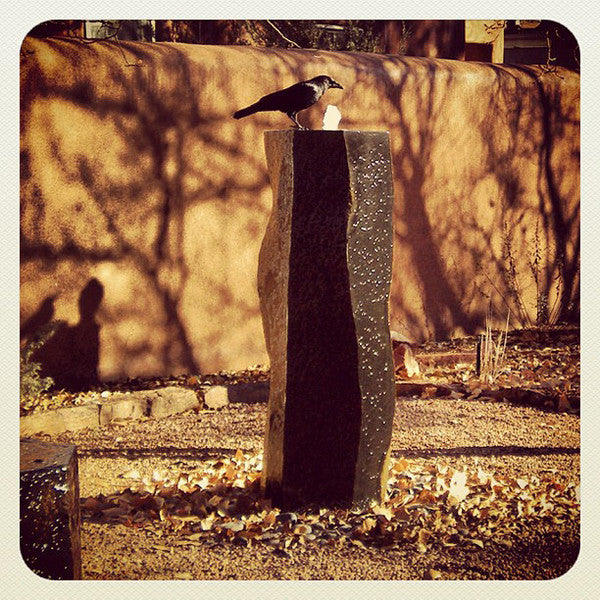
        • Place and center your Stone Forest Triple Basalt water feature on top of each pedestal.

        • Cut a length of tubing long enough to reach from the bottom of the basin to the top of the water feature: do this three times, since there is 1 pump for each section. Run the tubing through the center holes in the fountain, snaking out the bottom through the concrete pedestal’s center groove, and out the side. Connect it to each pump’s outlet fitting. The pumps should sit below the corner cut-out for easy access at anytime. There should be an extra square of galvanized grating that will act as the cover for this pump access (and prevent the pebbles from falling through).

        • You’ll notice that there is space left around the 1.25” drilled hole and the 5/8” diameter flexible garden hose that connects to your pumps below. To fill the space around the hose and fit it snugly into the top of the core-drilled hole, we wrap the top part of the hose with a strip of pond liner and electrical tape. See images below for reference:

        • It’s best if this pump access corner is on the side nearest the power supply. Run the pump power cord out the side, under the edge of the grating. Hide or bury as necessary (or as advised by your electrician). 

        • Cover the pump access area with an extra square of grating (from the cuts you made previously). Cover the reservoir with smooth river pebbles (or whatever you choose to use to conceal the basin). For this kit, we usually recommend Qty (11) 75-lb bags of the dark river pebbles. 

        • Fill your reservoir with water, plug the 3 pumps in, and VOILA! Grab a lounge chair and prepare to be relaxed by the soothing sounds of your new fountain.

        (An important note: If you are concerned about securing each section of this fountain into place to prevent them from falling over, Stone Forest can drill additional holes for "pinning" it into place. You'll need to drill holes into the concrete pedestals that align with these pin holes on site, and set stainless steel pins so that the basalt sections can slide into place. You could also pour the concrete pedestals on site and place the pins beforehand. Some installations may be in commercial environments, have earthquake risks, or have exposure to small children, pets or weather that could cause concern should the fountain move. No one wants their fountain to turn into dominoes! Please give Stone Forest a call to discuss additional pin-hole drilling costs and details.)


        ___________________________________

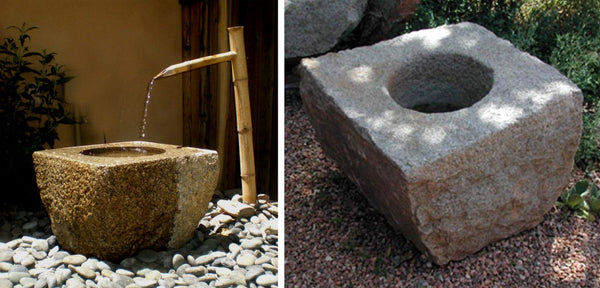
         In the Japanese tradition, water features run with a trickling bamboo spout instead of bubbling up through a center hole in the basin. Let's take a look at how that setup works a little differently.

        6. Basin with bamboo spout installation

        Click here to view the PDF version of the step-by-step instructions below.

        For a visual guide, see installation example below these instructions.


        • Get your shovel and level out. Dig a hole 10” deep, 29” square at the bottom, and sloping to 37” square at the top. Ensure that the ground at the bottom is level and solid (we used play sand from the hardware store in the bottom of the hole to create a nice “level” surface).

        • Place the basin into the hole, with the power cord cut-out facing toward the power source. Level, moving earth or sand around if necessary.

        • Insert the 8 supports into the 8 support holes.

        • Place the center plate (gray) onto the supports, pressing firmly to ensure full installation.

        • Install the 4 top plates. On the side nearest the power supply, run the pump power cord out the cord gap, under the edge of the top plate, and through the cord cut-out.

        • Install the 4 access covers, ensuring that the cut-out in each faces outward.

        • Place your Stone Forest water feature on top of the basin in the center, where the 4 top plates meet.

        • Place the bamboo spout beside the fountain so that the spout is positioned over the center of the basin. You can prop the spout up by surrounding it with pebbles (see step #9), or if you’d like to secure it to the kit (to keep it from tipping over on a windy day) we suggest connecting a wooden dowel up and into the side of the hollow base using a screw. You can then feed the dowel down through one of the holes in the top of the panels below (start by measuring the diameter of the holes and find a dowel slightly smaller in diameter). Alternatively, feel free to create your own method for securing the spout using tools at hand.

        • Cover the reservoir with smooth river pebbles (or whatever you choose to use to conceal the basin). For this kit, we usually recommend Qty (6) 75-lb bags of the dark river pebbles. You can build up the pile of pebbles around your spout to stand it in place, if you decide not to secure it to the kit panels below.

        • Fill your reservoir with water, plug the pump in, and VOILA! Grab a lounge chair and prepare to be relaxed by the soothing sounds of your new fountain. Adjust the position of the bamboo spout as necessary so that the stream of water hits near the center of the basin (or wherever you prefer the sound and look best).


        INSTALLATION EXAMPLE:

        View PDF, 36" Round Kit Basin with Bamboo Spout and Ishi Basin step-by-step

        You can view additional images by clicking on the link above, showing an example of the Stone Forest Ishi Basin being installed at a private residence in Virginia using the 36" Round Kit, bamboo spout, pump, and pebbles. This is a nice visual guide alongside these instructions (remember: you can use either the 36" or 44" kit depending on what's best for your setup). 

        Here's a video showing the fountain installed and running:


        ___________________________________

        A note regarding shipping & packing:

        We pack our items with pride and care. If anything arrives damaged, please call us right away and take photos for reference. Our 36" Round and 44" Square plastic reservoir kits are typically placed on top of your crated/palletized shipment (the fountain, pump and pebbles will be underneath), and our heavier 4x4', 6x6' and 39" Triple Kits are often palletized separately. Here's a few snapshots from the Stone Forest workshop showing an example of a 6x6' Installation Kit ready for freight pickup.

        You'll notice that the heavy concrete pedestal is at the bottom, still in its framing from when it was poured (you can pop the wood 2x4' out of the top center, which creates a groove to accommodate your hosing), the galvanized grating stands in vertical sheets, and the wood 2x6's are meant for your reservoir hole's framing in the ground.

        Please remember not to discard anything that arrives with your shipment until all components are accounted for, or fully installed. If you have questions about what you received, just give us a ring.


        ___________________________________

        7. Custom Installations

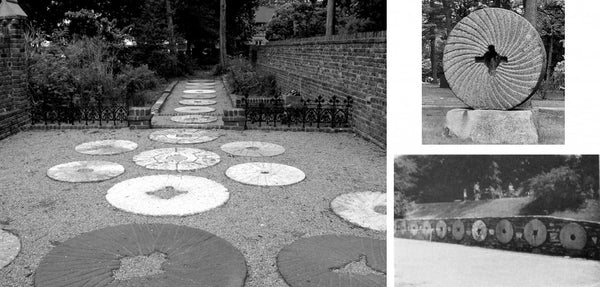
        Sure, the methods above are certainly not the only way to install a water feature! You can get quite creative with how your Stone Forest water feature is displayed. Below are just a few of our favorite examples showing how our clients decided to work with their architect or designer to create alternative reservoir setups:


        Here's our Small Antique Millstone Fountain with a custom-order base pedestal for added height in a front entry courtyard with custom pool and submerged river pebbles.


        Here's our Curved Waterwall in blue-gray granite in a custom above-ground reservoir with contemporary border and giant pavers. This home and landscape was featured in Garden Design Magazine. (Image courtesy of Jack Coyier Photography of Santa Monica, CA).


         Check out this stunning Custom Helix Fountain in a series of cascading pools. Love how you can see right into the water.


        If you decide to take the more creative route, please consult with a professional so that your Stone Forest fountain is properly supported and still allows for easy maintenance and access.

        If you decide to install your water feature using one of our methods listed above, keep in mind that you can add some beautiful finishing touches that really complete the look, for example, build in a border of larger rocks around the river pebbles like we did for our Marubachi Fountain:

        ...or soften the edges with surrounding plant life, and really integrate it into your garden and landscape, like this Rough Vessel with bamboo spout, as featured in Fine Gardening Magazine:

        If you've made it this far: we hope this article makes you feel like you're a true Stone Forest water feature aficionado! and bravo for sticking with it to the end. Now go brag to all your friends about your new fountain...and exactly how it works. Or, if you're reading this for information prior to your purchase: just buy it! You'll love your Stone Forest fountain each and every day.

        As we break out of the snowy gray days and welcome spring, we can't help but feel that child-like, giddy lightness as the trees show their new buds, the fresh green springs from the ground, and the ice on our stone fountains begins to thaw out.         [in Just-]...

        When the World is Mud-Luscious

        As we break out of the snowy gray days and welcome spring, we can't help but feel that
        child-like, giddy lightness as the trees show their new buds, the fresh green springs from
        the ground, and the ice on our stone fountains begins to thaw out.


        [in Just-]

        by E. E. Cummings


        in Just-

        spring          when the world is mud-

        luscious the little

        lame balloonman

        whistles          far          and wee

        and eddieandbill come

        running from marbles and

        piracies and it's

        spring

        when the world is puddle-wonderful

        the queer

        old balloonman whistles

        far          and             wee

        and bettyandisbel come dancing

        from hop-scotch and jump-rope and

        it's

        spring

        and

                 the

                          goat-footed

        balloonMan          whistles

        far

        and

        wee

          Let’s get to know Cameron Johnson. Oh hey, that’s me! My extension here at Stone Forest is 1007, which I have loved since day one since it means I’m “double oh seven” at your service. Working with the dynamite archive of photography, spending quality one-on-one time with visiting clients,...

        Profile Spotlight | Cameron Johnson


        Let’s get to know Cameron Johnson. Oh hey, that’s me! My extension here at Stone Forest is 1007, which I have loved since day one since it means I’m “double oh seven” at your service. Working with the dynamite archive of photography, spending quality one-on-one time with visiting clients, watching our newly introduced designs blossom in the marketplace, and working side-by-side with my dynamic coworkers are just a “few of my favorite things” from my day-to-day with this company.


        What’s your position at Stone Forest, and when did you start working here? Marketing and Garden Collection Sales Manager. August 2007

        Which Stone Forest Kitchen & Bath product gets you really jazzed up, and why? I remember walking into the Stone Forest gallery for the first time, and stopping in my tracks as I noticed the Veneto Pedestal Sink standing proud against the wall. The shape and sheer mass of the design is stunning (not to mention the onyx ones glow when backlit), and is at once contemporary/timeless.


        And your favorite Garden product? Oh, those Basalt Dome fountains! 


        Hometown: Charlottesville, VA

        Alma mater: University of Virginia. Wahoowa!

        Childhood hero: Madonna. (you know, the 80s “I wanna rule the world”, cone-wearing badass version).

        Favorite activities: Making things, being a total Francophile, collecting items washed ashore, taking on the annual challenge of having a Southwestern garden in zone 6b, swimming laps, hiking and snowshoeing in the NM wilderness, and above all, traveling this wide world.

        Song that gets me dancing:  “Let’s Dance”, David Bowie

        Signature cocktail: Manhattan made with Bulleit bourbon, straight up, in a coupe glass with a luxardo maraschino cherry. “Shaken, not stirred” as Bond would say.

        Last meal on earth: My husband Andy’s spaghetti.

        Book/movie you’ve read/seen over and over: Dirty Dancing. I broke the VHS tape I watched it so much. My parents were a bit concerned.

        If you could have dinner with one person from history, it would be: Edith Piaf

        Favorite place you’ve traveled or vacationed: Paris, France. And a very close second: The Saguaro National Forest in Tucson, AZ. Those cacti are otherworldly.

        If you could travel anywhere in the world, you would choose to explore: Australia & New Zealand.

        Why Santa Fe? Because you could probably walk about town in a Halloween costume on any given day and blend in. The culture is rich, the art is heavy, and the people are crazy (in a good  way).

        Why is working at Stone Forest so awesome? The team and the product are solid as a rock. We work hard and play hard.

        I’m known for: My karaoke addiction.


          Get out! As we welcome twenty sixteen, we reflect on our fast-paced environment and encourage you to unplug, slow down, and get outside this weekend. Celebrate that which inspires us most: the vast space and beauty of nature. Give yourself some quiet time to heighten your senses and prepare...

        S L O W D O W N | 2016 is soon to arrive


        Get out!

        As we welcome twenty sixteen, we reflect on our fast-paced environment and encourage you to unplug, slow down, and get outside this weekend. Celebrate that which inspires us most: the vast space and beauty of nature. Give yourself some quiet time to heighten your senses and prepare for what’s to come. Your gadget(s) will be there waiting for you afterwards, we promise.


        Make something!

        A hand-written, stamped, and sealed envelope received here at Stone Forest reminded us of our need to send something other than a text or email! There’s no substitute for something hand-crafted.


        Get inspired!

        And now, a few little haiku gems to read, digest, and help you slow the pace:

        No sky
        no earth – but still
        snowflakes fall.

        ~Hasin


        The lamp once out
        Cool stars enter
        The window frame.

        ~Natsume Soseki


        Experimenting…
        I hung the moon on various
        branches of the pine

        ~Hokushi


        Happy New Year from the nature-loving, hand-crafting, design-inspired team at Stone Forest

        BEFORE + AFTER : in his element   Let’s get to know Michael Zimber: Company founder, outdoor enthusiast, globetrotter, nature-addict, and the captain of the Stone Forest ship–always navigating forward as the waves of the world ebb and flow. And as the story goes: he gave up his time on...

        Profile Spotlight | Michael Zimber


        BEFORE + AFTER : in his element


        Let’s get to know Michael Zimber: Company founder, outdoor enthusiast, globetrotter, nature-addict, and the captain of the Stone Forest ship–always navigating forward as the waves of the world ebb and flow. And as the story goes: he gave up his time on the water as a river guide soon after his mom asked, “when are you gonna get a real job?” He recalls that her timing couldn’t have been better, and thought, “if I could somehow bring what I loved about being in the wilderness into people’s homes and gardens, it might turn into a rewarding new direction. Today, over 25 years later, I have stayed true to this original concept.” Indeed. Stone Forest designs celebrate the simple beauty of natural materials.

        He’s also known as “MZ”, although there’s no zzzzzz’s about this guy. He’s always a step ahead and his goal is to release six new designs every year. Surf’s up!

        What’s your position at Stone Forest, and when did you start working here? OMG, since 1989.

        Which Stone Forest Kitchen & Bath product gets you really jazzed up, and why? SYNC is still one of the coolest designs we’ve come up with. It’s hand-carved, modular, and works in a variety of applications.


        And your favorite Garden product? Mizubachi fountains still do it for me. We created the design in 1991, and continue to make it today.

        Hometown: Manhasset, NY

        Alma mater:  Prescott College in Arizona

        Childhood hero:  Tarzan

        Favorite activities:  Kayaking, backcountry skiing, and climbing.

        Song that gets me dancing:  “Roam” by the B-52’s

        Signature cocktail:  A cold IPA

        Last meal on earth:  A plate of Pad Thai at a street stall in Bangkok.

        If you could have dinner with one person from history, it would be:  Sir Richard Francis Burton: explorer, linguist and orientalist.

        Favorite place you’ve traveled or vacationed:  Burma

        If you could travel anywhere in the world, you would choose to explore:  Chile is perhaps next on my list.

        Why Santa Fe?  It attracts other weirdos like me + arts and culture + access to the outdoors.

        Why is working at Stone Forest so awesome?  Being around stone, water and cool, creative people.

        Bell tower in the entrance area of the Japanese Garden at the Albuquerque Bio Park in New Mexico.  When Catherine Hubbard came to Stone Forest to purchase a traditional Japanese Oribe lantern this past summer, we chatted about how inspiring just one sculptural element can be in an outdoor space....

        A visit with Japanese Landscape Architect Toru Tanaka at the Albuquerque Bio Park


        Bell tower in the entrance area of the Japanese Garden at the Albuquerque Bio Park in New Mexico.

         When Catherine Hubbard came to Stone Forest to purchase a traditional Japanese Oribe lantern this past summer, we chatted about how inspiring just one sculptural element can be in an outdoor space. Then, in December, she reached out and invited me and Michael Cahill to visit the  Sasebo Japanese Garden at the Albuquerque Bio Park, where she happens to be the Botanic Garden Manager. MC and his family are already members there, and enjoy the year-round activities that the gardens, zoo, and aquarium have to offer. We chatted on the drive down about the upcoming night-time show that they have each year for the holidays, called “River of Lights.”

        Catherine explained her invitation:

        “Toru Tanaka is the designer of the Japanese Garden in the park, completed in 2007, and continues to make frequent visits here to keep us true to his vision, and assist us with pruning.  In mid-December, Toru will be here with two of the members of his crew from his company in Portland, Japanese Garden Specialty.  They are always fascinating to watch as they prune our Japanese Black Pines and other plants as needed.

        Toru is an amazing person, and we feel so fortunate to have him as our designer and consultant: he is a true creative artist, as well as a talented and skilled horticulturist, and a nice person.  Here is a 2007 biography of Mr. Tanaka, who has been the Director of the Portland JG, has worked on the Anderson JG, and currently consults regularly with the Japanese Ambassador in D.C. on his garden (which is also in the Ogata style).

        If you, and/or any of your staff, would like to come to our BG while Toru is here, we would love to host you and introduce you to him.  We are just so proud of his work, and love to share him with others in NM who can also appreciate his skills and Japanese philosophy.”


        The wood entry gate to the rest of the garden, with carefully placed long, rectangular stone pavers along the pathway.

        Needless to say, it was an honor to walk and discuss the four-acre garden with Toru–a humble, generous person and a gentle soul. As we entered through large wooden gates, the pathway opens up to a large waterfall, central koi pond, and mixture of plant-life. Catherine pointed out that Toru didn’t want to tear down the existing native flora, but blend it with his traditional vision, creating a truly unique Japanese garden that also embraces Albuquerque’s natural beauty. One of the most dramatic elements that remains is the large cottonwood trees that stand as a towering backdrop to lanterns, pruned pines, curved bridges, and other hand-selected elements.


        The reflective koi pond encourages meditation and inner-quiet.

         
        As we walked the garden paths, we observed many large boulders bordering the garden paths and the pond edges, and Toru explained that he was very specific about the placement of these heavy stones, which speak directly to the wabi-sabi aesthetic, embracing the asymmetry and imperfections found in the natural world. Although the arrangement was very deliberate, the subtle hand of the designer attempts to mimic nature, and make it look as if the boulders have been there for centuries; this is a sign of success, explained Toru.


        Observing the Ogata Kai Garden.

        Left to right: Maria Thomas (asst. curator for the Japanese Garden), Michael Cahill (general manager + co-owner at Stone Forest), Toru Tanaka (Landscape Architect), and Catherine Hubbard (ABQ Botanic Garden manager). 

        We stopped quietly at the landscape’s newest addition: “a ‘garden-within-a-garden’ designed by five members of the Ogata Kai organization of Japanese landscape architects. The five architects, trained under the late Kenzo Ogata, created this beautiful garden in just four days (September 14-17, 2009),” explained Catherine.


        A Yukimi Lantern stands in a quiet stream.


        Catherine, MC, and Toru enter the bamboo forest.

         
        After following the pathways around the koi pond’s curve, meandering along the streams, and stopping to listen to the waterfall, the loop finishes with a small, lush bamboo forest tunnel. After thanking Toru for this time, I asked him if he felt proud of his accomplishment. He smiled, shyly, and said, “Oh, yes yes, sure. But it is always changing–never finished.” He then returned to his crew member’s side, who stood atop a ladder asking for confirmation on the spot where he was pruning a pine tree. They will take years to coax and shape into what Toru is envisioning.


        A pagoda-style sculpture sits on a hilltop.


        I would encourage locals and visitors alike to visit this beautiful garden. And a big thanks to Catherine for sharing this little sanctuary in the city.


        For more information, visit:

        http://www.cabq.gov/culturalservices/biopark/

        https://www.facebook.com/abqbiopark

        Here are some more tagged snapshots on flickr from various visitors.


        All photos above taken by Cameron Johnson.


        Stone Forest began with the simple idea of bringing the unsurpassed beauty of natural materials into people’s homes and gardens.  Twenty-five years later, we haven’t strayed from this original concept.This photo album takes a look back at our innovative “firsts” in the Kitchen & Bath industry as our 25th anniversary comes to a...

        Photo Album | 25 years of Groundbreaking Designs

        Stone Forest began with the simple idea of bringing the unsurpassed beauty of natural materials into people’s homes and gardens.  Twenty-five years later, we haven’t strayed from this original concept.
        This photo album takes a look back at our innovative “firsts” in the Kitchen & Bath industry as our 25th anniversary comes to a close and we aspire to continue as the creative pioneers you’ve come to know and love.
        Paired with a couple of bird-adorned hose bibbs as faucetry, this rustic vessel sink was introduced to the Decorative Plumbing Market as the first of its kind, sculpted from a single block of stone. At this time, Stone Forest was one of only a handful of companies offering above-counter vessel sink designs, most of which were made from cast materials (unlike the selected blocks of solid granite or marble we were using). We began the design process by extrapolating from our Garden Collection work, creating vessels with dimension by pairing rough-chiseled exteriors with polished rims and interiors for contrast. It’s also our first professional photo investment taken for the Kitchen & Bath archive of images, which is now an extensive collection of designs!
        The Beveled Round Vessel was another design based around the rough chisel/polish contrast.

        Around the same time, we introduced the first double-walled copper vessel sink and farmhouse sink. These are created from heavy 16 gauge copper sheeting and are virtually indestructible. The double wall construction also allows us to foam-fill the sink, which reduces reverberation (other copper sinks sound “tinny”) and gives the sink a pleasing, substantial feel. Unlike other brands (which are typically single walled with the exception of the front apron), our Copper Farm is double walled on all sides, which enables a number of mounting options including under-mount, flush mount, partially elevated and above counter.  One side of the sink is hammered and the other has a smooth front apron so that you can choose which surface to display.
        The rectangular Zen and Verona vessel sinks moved us into more contemporary territory, but prove to be timeless designs.
        We then took a round granite boulder, cleaved it in half, and carved out the center for the bowl: the Natural Vessel Sink was born. We have continued to carve sinks in this same vein in different sizes and materials (like our #C27 Wabi Vesselor #C28 brown Pebble Vessel). This really articulates our mantra, as explained by owner Michael Zimber: “Keep things simple and let the material speak louder than the design.”
        Around the same time, our Zen Vessel Sink design was thinned down and re-introduced in sand-cast bronze.
        We then decided to venture out and explore new material possibilities, finding exotic stones like honey and multi-colored onyx (shown above) and carving completely high-polished versions of our existing vessel sink designs. The natural veining in onyx proved to be an exciting, jazzy spin on the subtle sink shapes, and soon bathrooms were being designed around the dramatic color schemes of the material itself.
         Adding to our growing repertoire of unique pedestal designs in stone and iron (to hold all those lovely vessel sinks, of course!), the hand-crafted L-slab pedestal in wood provided a rich base for one of our stone or metal vessel sinks. This sparked an entire collection of “natural edge” hardwood furniture made from thick slabs of sustainable hardwood (including wall-mounted countertops and consoles). Handcrafted using mortise and tenon joinery, our designs emphasize the natural or outer edge of the tree as well as other unique characteristics including burls, knotholes and naturally occurring checks/ cracks. In order to create a sustainable product, we mill small growth trees and laminate the planks together in order to create an old growth, large slab look. The slabs contain a mix of heartwood and sapwood, with resulting variations in light and dark grain. Butterfly joints are used both to control cracks and for purely decorative reasons. All of our natural edge hardwood products reflect the individual characteristics of the tree from which it was made and each piece is one-of-a-kind.
        Around the same time, our curvaceous Papillon Bathtub won Interior Design Magazine’s Best-of-Year Award and is still one of our best-selling designs to date, chosen for projects around the globe.
        The industry’s first solid bamboo sink is born with our “Moso” design, and was recognized as Interior Design Magazine‘sBest of Year Award winner in 2007, and as a GOOD DESIGN™ Award winner in 2008.
        Around the same time, we reintroduced our beveled round metal vessel sink in all stainless steel or combined copper/stainless materials, seamlessly combining the turned exteriors and foam-filling them for an elegant, substantial end product.
        And then, another star was born. Our SYNC System is a unique modular concept offering multiple combinations of sinks, countertops, and shelving made of stone and stainless steel. You can create your own custom layout for any space, and each component is joined by sleek wall brackets, which double as towel bars on each end. SYNC was recognized with the Decorative Plumbing and Hardware Association’s Innovative Product of the Year Award for 2008.
         Around the same time, we introduced the Bordeaux and Vintage Vanities, making an old-school design new again: but from one solid piece of stone. Traditionally fabricated with a joined porcelain basin and stone countertop, these classic vanity sinks are carved from a single block of Carrara marble. Combine the subtle detailing of the washbasin with traditional console legs in metal, and voila!
        This throwback broke out on the scene this spring and has received one of the strongest responses for a new product to date. Paying homage to a memorable era, the Industrial Pedestal in cast iron draws on the utilitarian forms of the factory floor. It pairs nicely with one of our very own vessel sinks in stone or metal (yep! that beige vessel you see on top takes us back to 1993 with the beginning of our album. what goes around comes around.)


        As we celebrate the start of 2014, we also reflect on our 25th year in business.  Creating beautiful designs for the home & garden for a quarter century has been a satisfying and challenging ride.  Here, we’d like to take a look back on some of our design “firsts” for...

        Happy Birthday to us! | Stone Forest celebrates 25 years

        As we celebrate the start of 2014, we also reflect on our 25th year in business.  Creating beautiful designs for the home & garden for a quarter century has been a satisfying and challenging ride.  Here, we’d like to take a look back on some of our design “firsts” for the Garden Collection, fondly remembering our beginnings, and honoring how far we’ve come.


        Have you ever wondered how to prepare your Stone Forest fountain for winter weather?Here are the steps we recommend and why: 1. Empty your reservoir | You can either let the water evaporate, pump it out with your submersible pump + hosing, or pull it out with a shop vacuum....

        Stone Forest How-To | Winterize your Fountain


        Have you ever wondered how to prepare your Stone Forest fountain for winter weather?
        Here are the steps we recommend and why:

        1. Empty your reservoir | You can either let the water evaporate, pump it out with your submersible pump + hosing, or pull it out with a shop vacuum.  This process can double as cleaning in preparation for use in the spring, so that you can fill up with fresh water and it’s ready for another 3 seasons of use.
        2. Disconnect and unplug your pump and put in on the shelf | Keeping your pump out of the cold weather will help to prolong it’s life.  Our submersible pumps have a 1-year warranty, with an average life span of 3-5 years, depending on how often it’s running and how you care for it.  Of course, if you have hard-wired your pump, then this isn’t an option.  You could wrap it in plastic or ziplock bags to keep it protected if it needs to stay in the reservoir.

        3. Let the fountain “transform” into a piece of sculpture | Since we carve most of our fountains designs from solid blocks of granite and basalt, the stone is so dense that it can withstand freezing temperatures, and can remain uncovered as a dry piece of sculpture (unlike softer, more porous stones, ceramic, or concrete materials).
         
         
        An alternate school of thought | Don’t worry, be happy!
         Our wintered Sky Mirror Fountain at our Garden Gallery with icicles galore.
        If you’ve ever visited or driven by the Stone Forest Garden Gallery during the winter months, you might have noticed that we tend to run our water features year-round and they turn into beautiful “ice sculptures.”  We do get freezing temperatures and snow in Santa Fe, New Mexico because we’re located at 7,000+ ft altitude in the high desert.  If you do choose to run your fountain through the winter, here are a few things to keep in mind:

        Typically, when average winter temperatures are upon us, the top few inches of the underground reservoir’s water freeze and the pump is still able to run underneath this frozen layer in the water below.  The water will then freeze in a “layer cake” effect over the stone itself, and thaw out as the sunshine emerges, and melt back into the reservoir below.  Of course, if you’re in a climate that’s so cold that the water freezes solid, then your poor pump could die a slow, painful death.

        The idea is to keep an eye on the weather and your fountain’s water level, and since the ice will cause the reservoir’s water level to drop quickly, you’ll need to keep it full enough for the pump to continue to run.  As you can see in the image below, the fountain really started to build up an ice shell, and was eventually shut down because the water began to flow outside of the reservoir’s parameters, and we had a particularly cold winter that year.  In short, use your best judgement for what your fountain setup can handle.

        The good news?   A replacement pump is typically about $42-$280 depending on which design you have, so if you wish to enjoy it year-round, you can!  Your pump might have to be replaced more often, but it’s a small price to pay for year-round enjoyment.
        If you live in North Dakota, you might consider taking my first steps of recommendation and shut your fountain down since it might become more of a babysitting situation than you bargained for!  If you’re in Florida, it’s smooth sailing for 4 seasons of non-stop enjoyment you lucky ducks.
        A Dragon Jade Fountain at a private residence in Santa Fe, NM.


        Ok, we haven’t seen any lions interact with Stone Forest…yet. But we have seen a few interesting critters stop in for a drink, bath, or snack … or just to say hello.  Here’s our wildlife collection so far:  Have any great shots of “Stone Forest wildlife” that you’d like to...

        Lions and Tigers and Bears, Oh My!

        Ok, we haven’t seen any lions interact with Stone Forest…yet.

        But we have seen a few interesting critters stop in for a drink, bath, or snack … or just to say hello.  Here’s our wildlife collection so far:

         Have any great shots of “Stone Forest wildlife” that you’d like to share?  We’d love to see them.  Please send your info and images to: info@stoneforest.com.

        Let’s get to know Michael Cahill: Renaissance man, co-pilot, stone aficionado, patience guru, CADD master, the glue that keeps this team together, and the guy that always has all the answers.  Also known as “MC”: short for Michael Cahill or master of ceremonies.  What’s your position at Stone Forest, and when...

        Profile Spotlight | Michael Cahill


        Let’s get to know Michael Cahill: Renaissance man, co-pilot, stone aficionado, patience guru, CADD master, the glue that keeps this team together, and the guy that always has all the answers.  Also known as “MC”: short for Michael Cahill or master of ceremonies.

         What’s your position at Stone Forest, and when did you start working here? General Manager and partner, 1997.

        Which Stone Forest Kitchen & Bath product gets you really jazzed up, and why?  The Papillon bath tub.  It was the first ‘unusual’ shape that we introduced into our line and was a lot of fun creating in CADD.


        And your favorite Garden product?  Mizubachi Fountain.  I love the black granite and it’s mass and really enjoy the contrasting textures on this piece particularly.


        Hometown:  North Tonawanda, NY

        Alma mater:  State University of New York College of Environmental Science and Forestry (or SUNY ESF for short)

        Childhood hero:  Tony Hawk

        Favorite activities:  Mountain Biking, Hiking, Snowboarding, spending time with the family.

        Last meal on earth:  Anything with green chile!

        Book/movie you’ve read/seen over and over: Brotherhood of the Wolf.

        Favorite place you’ve traveled or vacationed: Ireland

        Why Santa Fe?  I fell in love with the people, the environment and the sun when I came out visiting at the age of 16.

        Why is working at Stone Forest so awesome? The varied tasks and opportunities that make almost every day different.

        I’m known for:  My laid back kinda style.

        One each for the closing and beginning of the year.   |  Farewell Twenty Twelve borrowing sleep from the scarecrow’s sleeves midnight frost -Matsuo Basho     |  Hello Twenty Thirteen New Year’s first snow — ah — just barely enough to tilt the daffodil -Matsuo Basho

        Two Haiku

        One each for the closing and beginning of the year.
         
        |  Farewell Twenty Twelve
        borrowing sleep
        from the scarecrow’s sleeves
        midnight frost
        -Matsuo Basho
         
         
        |  Hello Twenty Thirteen
        New Year’s first snow — ah —
        just barely enough to tilt
        the daffodil
        -Matsuo Basho

        Chinese Grain Mill, circa early 1900s | Photo scanned and posted by Wolfgang Wiggers of Ottersberg, Germany Take a closer look at this image.  There are two granite components that make this mill work: a stone roller/runner stone (on top) and a millstone/bedstone (on bottom).  By combination of repeated rotation, heavy...

        From Workhorse to Water Feature | The history behind our Antique Millstone Fountains

        Chinese Grain Mill, circa early 1900s | Photo scanned and posted by Wolfgang Wiggers of Ottersberg, Germany
        Take a closer look at this image.  There are two granite components that make this mill work: a stone roller/runner stone (on top) and a millstone/bedstone (on bottom).  By combination of repeated rotation, heavy weight, and carved ridges in the stones, the donkey grinds the grain down for everyday use.  The ridges on a pair of grinding stones work together to cut the grain down as they rotate.
        Look even closer.  See the faint, star-shaped pattern carved into the top of the stone roller?
        The drawings below also show this traditional method of grinding in China.  The contemporary artist Huang Rui recreated the millstone for an exhibition in Beijing in May 2012.  Titled Rumor Mill, the millstone was used to grind 5 different kinds of grain with a real donkey, which were then bottled, signed and sold on-site.

        Sketches for the installation Rumor Mill by Huang Rui |  Designed for RAZE: a site-specific exhibition in Beijing.

        And here is another more recent set-up, showing how the top runner stone circulates:

        The repeating patterns on the surface of a millstone are called harps, and are made up of furrows (grooves) and lands.  Our small antique millstones have eight harps, for example.

        Photo by Cameron Johnson  |  Diagram from The Art of Millstones, How They Work 
        When these grinding stones were joined face-to-face, they created a cutting motion, almost like scissors.  Due to the wear & tear from repeated grinding, stones periodically had to be re-cut, or dressed, to maintain their sharpness.

        A Short History of Technology by T.K. Derry & Trevor I. Williams  |  sited by Matthew Scheer
        Here at Stone Forest, we have 3 types of antique grinding stones available for use as water features or decorative sculpture.  Each unique stone is about 100 years old, and carved from beige granite.
        1.  Antique Millstones (or bedstones, as discussed above)

        Small Antique Millstones
          |  Approx 11″H x 19-24″ diam

        Large Antique Millstones  |  Approx 16″H x 48″ diam  |  Our “One-of-a-Kind” gallery shows available designs

        Owners Michael Zimber (left) and Michael Cahill (right) stand atop one of the Colossal Antique Millstones  |  Approx 30″H x 65″ diam  |  Our “One-of-a-Kind” gallery shows available designs
         
        2.  Antique Grinding Stones (or runner stones, as discussed above)

        Our “One-of-a-Kind” gallery shows available designs
         
        3.  Antique Grinding Basins

        Our “One-of-a-Kind” gallery shows available designs
        These square-shaped basins would have been used as a “mortar and pestle” for grinding grain by hand: a smaller-scale version of the millstone operation explained above.  Another commonly-used grinding method is with a rotary quern, or hand mill, as shown below:
        The grinding abilities of millstones have caused an evolution of size, pattern, and style used for different types of industry all over the world, ranging from agave to cork to corn to wheat.  There are many working mills still in operation today that show demonstrations in technique and continue to sell their grain.
         
        After extracting a millstone from rotation for reasons including cracking or deterioration that could not be re-surfaced, these features were used for a variety of applications such as stepping stones, miller’s gravestones, water features, and outdoor walls among others.  Millstones have evolved into decorative elements that have a massive presence, beauty of pattern, and worn sculptural history.

        Images show use of old millstones as stepping stones, a gravestone, and retaining wall features.
         
        So as you consider your own landscape, take a moment to ask yourself if the presence of a well-worked, well-loved millstone or basin would enrich your space as it begins its second life as a recirculating fountain.  We’re betting it will.
        Sources  |
        Flory, Paul B.  Old Millstones.  Native Cocalico and French Buhr Stones. Embedded in a Retaining Wall by the Flory Tennis Court, at Martic Forge, PA.  http://www.angelfire.com/journal/pondlilymill/flory1.html
        Hazen, Theodore R. and Pond Lily Mill Restorations.  The Art of Millstones, How They Work. http://www.angelfire.com/journal/millrestoration/millstones.html
        Hermitage Museum & Gardens, Norfolk, VA.  Source for image: http://www.thehermitagemuseum.org/gardens/millstones
        learningasigo.  At the mill.  Blog post.  Posted July 18, 2009.  http://learningasigo.typepad.com/learning_as_i_go/2009/07/at-the-mill.html
        Jones, R. M.  Sleepy Hollow Cemetery, Concord, MA.  Source for image:  http://www.thevlecks.net/rmj/sleepyhollow1.jpg
        Wiggers, Wolfgang/ookami_dou of Ottersberg, Germany.  Source for image:  http://www.flickr.com/photos/15693951@N00/3923551744/.
        Wikipedia: The Free Encyclopedia.  http://en.wikipedia.org/wiki/Millstone

        Our New Small Antique Millstone Fountain | Photo taken by Eric Swanson   Yes, spring is near, but winter still has it’s hold. I’m already daydreaming of sprouts emerging in my edible garden, of my crabapple trees budding and blooming, and of turning my Stone Forest fountain back on to...

        Ah, Those Soothing Fountain Sounds


        Our New Small Antique Millstone Fountain | Photo taken by Eric Swanson
         
        Yes, spring is near, but winter still has it’s hold.
        I’m already daydreaming of sprouts emerging in my edible garden, of my crabapple trees budding and blooming, and of turning my Stone Forest fountain back on to hear that soothing sound of water streaming over it’s smooth stone surface.
        Many of our clients who inquire about our fountain and basin collections ask us “what does it sound like?” or “how loud is it?”.  These are tricky questions to answer, since there are many factors that contribute to the sound that your fountain will create.
         
        1. Size & Shape | Are you looking at one of our Ishi Basins?  Sure, this is our smallest fountain, but when it is set up with a trickling bamboo spout that stands 10″ above the piece, the thin stream of water hits the inner pool creating a concentrated waterfall that gives out a deeper-toned splashing noise.  Using a bamboo spout over a basin is based on traditional Japanese tea garden design, and can be used with any of our basins.  As the size of the “pool” in the basin gets larger, the tone of the falling water deepens too.

        Because of their tall, columnar shapes, one of our Basalt Column or Natural Boulder Fountains has water that bubbles from the top/center of the piece and clings to its sides as it falls to the bottom and drops down into the underground reservoir for recirculation.  Although they still create wonderful sound, it tends to be a little more subtle because the movement is gentle and gradual over the stone’s sides.
        In contrast, our Natural Millstone or Sky Mirror Fountains have a large surface area and elevated tops, so the water is moving with a greater amount of motion overall, as well as dropping a farther distance down into the reservoir.  Noise is created when the water hits the surface of the pool underground.  Our stunning Curved Waterwall also boasts great noise because the water flows over the entire 6-foot long surface, and simultaneously falls in one long sheet of droplets into the reservoir below.

        2. Pump Size & Flow | Our submersible pumps push a certain number of gallons per hour (or gph).  We match our various pump sizes with the stone piece based on overall height and dimensions to allow for proper flow.  Should you desire more/higher flow, you can always bump the pump size up a notch.  You can also play with the way the water flow appears, like a higher “geyser” coming off the top (as seen in the Natural Millstone Fountain video below), or an almost still, “glassy” look (as seen in this image of our Water Table Fountain).  Moving water is easily slowed or “glassed” down by setting some of the surrounding beach pebbles into the “pool” of the fountain.  This is the easiest (and most fun!) way to play with the water level that emerges out of the top.  You can also pull or push the flexible garden hosing out of the hole in the top of the fountain.  This will encourage more flow, or restrict it.

        3. Environment | Where will your fountain live?  Will you place it in your backyard, or a quiet courtyard?  Do you live near a street with heavy traffic?  Is it for indoor use?  These questions also apply directly to the level of sound that you will hear from your fountain.  If the piece is indoors, or is near a wall, the sound tends to bounce off of these surrounding surfaces and seem louder or more present.  If your fountain is placed in a front yard on a busy street, traffic might occasionally drown out the sound of the water.  This is something to keep in mind when selecting the piece, aside from the usual question of design & aesthetic.

        In response to your inquiries, we decided to take videos of a few of our most popular outdoor fountains in action.  The third video is a good example of the sound created with the bamboo spout, as discussed earlier.  Hit the “play” button on each below to view them:
         
        So as you daydream of your emerging spring spaces, try to imagine the calming sound of water alongside your blooming plant life, outdoor patio, front entryway, or any other space calling for a more alluring atmosphere. Not to mention the drinking, bathing, and fluttering birds you’ll attract!
        Japanese Shide | Photo taken by John Kinkade of Columbine Gallery in Loveland, CO This traditional Shide (pronounced she-day) is a folded zig-zag shaped white paper sculpture that hangs in the entryways of Japanese temples and shrines.  Hung for the New Year, they usually adorn these twisted rice ropes, or Shimenawa, which are said...

        Welcome, Twenty Twelve

        Japanese Shide |
        Photo taken by John Kinkade of Columbine Gallery in Loveland, CO

        This traditional Shide (pronounced she-day) is a folded zig-zag shaped white paper sculpture that hangs in the entryways of Japanese temples and shrines.  Hung for the New Year, they usually adorn these twisted rice ropes, or Shimenawa, which are said to separate the sacred from the profane, keep impurities out, and purify the space within.

        Shide paper strips are also attached to a wooden “wand” and then used in a Shinto ritual called harai, or “sweeping” to remove unwanted spirits or impurities.  I love how Timothy Takemoto (sourced below) theorizes that the shape “resembles lightning” and the sound is a rustling that “hangs in the air” and wakes the spirits.

        On a recent visit to Stone Forest, our friend John Kinkade brought some of these Shide for us to see in person.  In honor of the new year, I leave you with this powerful, delicate, cleansing symbol.

        Here’s to new beginnings.


        Sources |

        Wikipedia: The Free Encyclopedia.  http://en.wikipedia.org/wiki/Shide_%28Shinto%29

        To learn how to fold a Shide, and read more about their significance, visit this site created by Timothy Takemoto.

        my thin-skinned wandering by Piper Leigh | Book cover   Piper Leigh came to Stone Forest with a vision. Having just completed a book of her own poetry and photographs, she was seeking a space to host the release & reading of her new work, including the installation of her...

        Poetry in Motion | An evening with Piper Leigh

        my thin-skinned wandering by Piper Leigh | Book cover
         
        Piper Leigh came to Stone Forest with a vision.
        Having just completed a book of her own poetry and photographs, she was seeking a space to host the release & reading of her new work, including the installation of her hand-sewn kimonos.  “I just knew this was the perfect place,” said Piper when we sat down in the sunshine on a natural granite boulder bench to brainstorm on the event planning.  Perfect because the event was to combine word, voice, image and installation together to create an atmosphere for the attendees to experience.  In other words, Piper wanted to bring her book to life, and reinforce the fact that she “sees poetry as a conversation- listening and giving voice to the weave of story, community and land.”

        Invitation | Left: Kimonos and photo by Piper Leigh | Right: Granite Wabi Basins by Stone Forest
         
        About the Book |
        Renée Gregorio of Tres Chicas Books describes my thin-skinned wandering as a book that “embraces image, language and texture through poetry and photography.  It is a powerful invitation for the reader to become more than a reader of poems-to engage with transparency, the literary fragment and the image in such a way that the book becomes felt-experience, both physically and emotionally.  The poems are a testament to what is born of loss, to the abiding natural world, and to embracing the intensity of longing so that the door can be opened to what mystery reveals.”
        About the Author |

        Piper Leigh is the founder of Comunica, where she designs “interactive workshops to help leaders and teams communicate, collaborate and innovate” by encouraging creative interactions.  She publishes limited edition artist books, participates in collaborative projects, and creates installations with different forms and materials like scrolls, mobiles, and kimonos.

        The reading took place on the evening of October 6th, with strong attendance that filled the interior gallery space (a few guests even sat in our marble Papillon Bathtub because of limited seating).  Beautiful, translucent kimonos suspended from aspen tree branches billowed in the breeze outside against a dramatically stormy sky, and some spun slowly inside the gallery from strings.

        The kimonos’ dancing movement outdoors was a contrast to their floating movement indoors.  They spread their beautiful, light-weight arms like ghosts or clouds over the weighty carved stone, crafted wood, and cast bronze objects arranged throughout the spaces.  Guests buzzed with excitement as they waited in line to purchase their own copy of the book, walked throughout the garden, and found seating.  As I flipped through mine, I noticed that the text is printed in dark gray, the pages contain more white space than text or image, the photos are black & white with soft borders, sheets of translucent vellum veil the words and images, and then reveal them crisply underneath.  Colorless.  Yet full of color, continually sparked by phrases like “dusty blue” or “scarlet saturation” or “inside an indigo kimono”, letting your mind’s eye envision it’s own hues.  The book is delicate and tangible and intimate.
        Suddenly voices quieted down, and a screen was projected onto the large adobe wall above the Curved Waterwall Fountain.  Piper read a selection of poems that were carefully coordinated with the images and words emerging and dissolving quietly over the wall behind her, mimicking the layered movement through the pages of the book itself.  The photography depicted moments in nature in both expansive and detailed states, as if to remind the stone, wood, and metal sculpture in the room of their own journeys and origins.  This sense of observation and reflection permeated the room; all remained hushed and attentive until her last words were spoken.  Shortly after applause, a long queue formed for author signing and congratulatory remarks.
         Q&A with Stone Forest & Piper |
        SF:  Was there a particular event or moment that sparked your desire to write this collection of poems?
        P:  I was invited by Tres Chicas Books to create a book using language, poetry and image.  I had been making installations and different forms of artists books (small editions of scrolls, Japanese bindings like flutterbook, mobiles).  I saw it as a challenge to create a trade-publication that could invite people into an experience which included white space, fragment, image, and poems.  Could I create transparency in such a book?
         
        SF:  Tell me about the title of the book.
        P:  I continue to wonder: what will it take to travel in the world unarmed, without armor, and allow my self to be touched by the world?  What will it take to commit to respond to the call of what meets me…without a plan or predictions?  This is my thin-skinned wandering.
         
        SF:  What inspires your photographs?
        P:  I am fascinated by unexpected connections and encounters in the wilderness, in community, at my desk and in travel.  The images spark and trigger poems.  The poems often surprise me in the meaning that surfaces out of the direct experience of writing.
         
        SF:  What inspired you to hand-craft kimonos?
        P:  I kept wanting to go bigger. See the words in different layers, textures and contexts.  Kimonos came to me out of the wish to wear my words.  They have an inner lining and a public side…elements of mystery, dance and music.  What if they were transparent?
         
        SF:  Name a few of your favorite poets.
        P:  Jane Hirshfield, Seamus Heaney, Adrienne Rich, Eamon Grennan, Mark Doty, Linda Gregg, Lynda Hall…I could go on and on.  And, of course, poets we are lucky to have in our own community like Tres Chicas (Renée Gregorio, Miriam Sagan, Joan Logghe) and many others.  There is a strong and very much alive poetry and art community here.  We are very fortunate.
         
        SF:  Why did you choose Stone Forest as the location for reading and book signing?
        P:  The work of Stone Forest is an exquisite combination of nature and the work of human hands.  The qualities of water, movement and beauty in stone very much resonates with my experience of poetry and art.  I have always delighted in this unexpected, secret garden right next to busy St. Francis drive.  The “showroom” is warm, intimate AND spacious; a place people could listen, perhaps even dream.  The connections between our small town, faraway places and artisans is the best of the concept, global.  It seemed a perfect setting.  I could see the kimonos in the garden and we got to see them with plenty of wind, movement and changing stormy twilight light.  It was great!
        After leafing through the long, smooth pages of my thin-skinned wandering in the cozy quiet of my own home, I’d like to share a couple of my personal favorites:
        To purchase a copy of my thin-skinned wandering ($30, 250 pages  7.75″ x 11″), please contact Piper directly at piperleigh@comunica.com.
            1. Ornament and Tradition |  Historical context for enduring design  Traditional bronze Japanese temple lanterns in Kyoto, Japan | Photo by Carl Parkes of San Francisco, CA   The temples and shrines of Japan used lanterns made in bronze, iron, and stone to hold votive candles as a decorative,...

        Stone Lanterns | A nod to our beginnings


        1. Ornament and Tradition |  Historical context for enduring design
        traditional bronze japanese lanterns kyoto
         Traditional bronze Japanese temple lanterns in Kyoto, Japan | Photo by Carl Parkes of San Francisco, CA
         
        The temples and shrines of Japan used lanterns made in bronze, iron, and stone to hold votive candles as a decorative, spiritual, and symbolic element in these sacred spaces as early as 6th Century AD.  These traditional lanterns weren’t meant to provide functional light for pathways, but as the Japanese tea ceremony started to develop in the 16th Century AD, they were borrowed and placed in the garden for ambiance and reference to transcendence.

        Opinions vary as to whether tea ceremonies were regularly practiced during daytime or night-time hours, but most sources agree that the evolution of the stone garden lantern design resulted from tea masters seeking elements for the environment where they would practice.  It was important that these items be in keeping with the concepts of transformation and “wabi-sabi”, or the aesthetic that embraces finding beauty in imperfection and impermanence.  This speaks directly to the desire to be surrounded by objects from the natural world, made of natural materials.  Sukiya Living Magazine suggests that some tea masters “may have sought a subtle, slightly ‘man-made-looking’ lighted object to distinguish the mood of the tea garden from that of a dark and raw mountainside” but bring up tea master Soh’hen Yamada’s comment that “lanterns are not street lights”, explaining that appearance was far more important than functionality, and that other sources of light, such as torches or hanging paper lamps, were used to light these spaces.

        2. Beauty and Design |  Styles and Types of Stone Lanterns

         Types of Japanese Stone Lanterns  |  A Japanese Touch for your Garden  |  Drawings by author Kiyoshi Seike
         
        Stone lanterns are carved in a variety of shapes, sizes and styles.  The book A Japanese Touch for Your Garden presents a general classification of the more well-known styles under these categories:

        -Tachi-gata | Pedestal Lanterns:  Larger, show-stoppers, usually comprised of about six stacked pieces, feature a base pedestal.  The Stone Forest lanterns inspired by this type of style are:
        tachi-gata stone japanese lanterns
        –Ikekomi-gata | Buried Lanterns:  Lack base pedestals, so they are buried directly into the ground like emerging light posts, but still boast height.  As the image shows, some mimic the complexity of the pedestal lantern, while others have a simpler, less ornate design.  The Stone Forest lanterns inspired by this type of style are:
        –Oki-gata | Small, Set Lanterns:  Small, low, subtle, and often placed “on the edge of a pond, at the side of a path, or in very small courtyard gardens.”  The Stone Forest lanterns inspired by this type of style are:
        oki-gata stone japanese lanterns
        –Yukimi-gata | Snow-Viewing Lanterns:  Elegant with open legs and wide roofs that are usually round or hexagonal in shape.  Usually placed “near water elements”, and “so named because of the delicate way they hold snow on the roof.”  The Stone Forest lanterns inspired by this type of style are:
        yukimi-gata stone japanese lanterns
        An interesting tidbit |  The beige granite lantern on the left, and the two blue-grey lanterns on the right are called “Yukimi” lanterns.  Sukiya Living Magazine explains that it is “related to the term uku, which means ‘to float’,” and refers to the idea that the reflection ‘floats’ on the water’s surface.  Contrary to popular belief, Sukiya Living Magazine argues that the word yukimi is not related to snow at all, and that it’s Japanese characters were misinterpreted.  “Yukimi style lanterns have always been used in sub-tropical regions where it never snows, and they are not used in tea gardens- a garden style famous for its expression of winter beauty.  At the same time, there are countless examples of yukimi lanterns being used correctly at the water’s edge, displaying their light, cheerful, and ‘floating’ character.”

         
        3. Functionality and Placement |
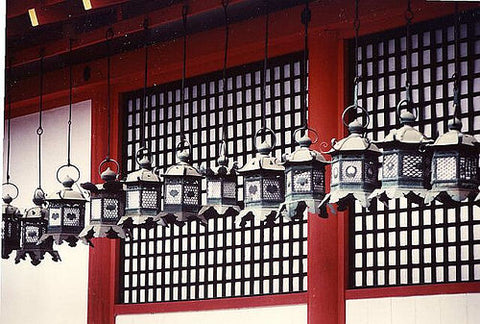
        Although traditional Japanese stone lanterns were not designed with the intention of providing enough light for seeing at night, Western civilization has often adapted these designs to provide functional lighting.  “In Japan putting an electric light bulb in your stone lantern might be seen as somewhat humorous,” writes Sukiya Living Magazine.  Indeed, you’ll find that most U.S. Japanese Gardens or private enthusiasts are more likely to point a spotlight toward the stone lantern so that it can be admired, versus installing bulbs or candles inside. Here at Stone Forest, we core-drill most of our lantern designs to accommodate electrical  wiring so that you can choose how you use them.  You’ll find that our few exceptions to drilling are the more ornate pieces, like the Kotoji, which don’t take the drilling due to their shape, delicate size, or overall design.  Since we are “core” drilling, the hole is hiding on the interior of the piece, so it’s not a hindrance to the overall appearance. Assembly is also important to stone lantern display.  Sukiya Living Magazine explains the names and positioning of the different sections of a large stone pedestal-style lantern, all carved carefully for balance and easier moving.  We’ll use our Kasuga lantern here as a visual reference:

        You can see that the small set and snow-viewing style lanterns have similar sections at a smaller scale (shown in part 2, above).  Stone Forest’s buried-style lanterns have extra length in the post for anchoring in soil or cement.  When installing in soil, pack rocks tightly around the buried base.  Bonding the individual pieces together with an epoxy is optional, and provides further stability.

        So which design would you choose?  Once you make the big decision on which type of stone lantern(s) would show best in your space, you’ll want to find the perfect spot to showcase it.  Nowadays, with a seemingly endless array of options for landscaping style & materials and electrical resources & aesthetics, the residential garden is a blank canvas to be colored for your enjoyment.  No rules!  Since we are adopting and adapting a centuries-old tradition, it’s nice to reflect upon the evolution of stone lantern placement, and perhaps incorporate some of these ideals.

        Sukiya Living Magazine explains that in Japanese tradition, “although stone lanterns are ornaments, they are often positioned in spots where they appear to be useful or at least usable.  This practice is intended to remind visitors about graceful living and the wabi lifestyle.”  This etiquette dissolved when the tea ceremony began incorporating more and more decorative elements into the space, and “tea style and tea taste spread into society.”  Suddenly, lanterns were deemed worthy of being the focal point in a garden view instead of blending into their surroundings.  Indeed!

        4.  Personal Experience and Preservation |

         All images in this section taken by John Kinkade
         
        John Kinkade, owner of Columbine Gallery in Loveland, CO and Executive Director of the National Sculptors’ Guild, took a trip to Japan in December of 2010 to visit his son, who moved there to teach English.  They connected in Kyoto, and embarked on a two week trek through the shrines, temples, castles and ancient cities of southern Honshu Island and the Island of Kyushu.  “I was especially interested in experiencing the landscape architecture of Japan’s gardens,” says Kinkade, who participates in design teams that collaborate for the placement of public art throughout the United States, including the one-acre sculpture garden on grounds at Columbine, which serves as the host to the NSG’s incredible collection, or as he calls it “his pride and joy.”

        Placed throughout these landscapes that Kinkade visited were thousands of stone lanterns.  Their first stop was the Shinto Shrine of Fushimi Inari, known for its 10,000 bright orange torii gates at the entrance.  Kinkade recalls, “I was surprised to also discover the first of many paths lined by stone lanterns.  This is where I learned that during festivals and ceremonies rice paper is cut to fit the windows in the stone lanterns to increase the reflection of the candles placed inside them.   This isn’t done with any permanence and these paper lenses soon blow away or fall from the lanterns, but for one perfect evening or event, the glow is magical.”
        After continual touring, Kinkade says that one of the most memorable stops on his trip was Iso-Teien, which is located in the city of Kagoshima.  In 1658 (and expanded to its present form in 1848), Shimazu Mitsuhisa, ruler of this region, created his grand villa and gardens “to encompass the view of the Kinko Bay in the foreground and the towering volcano Sakur-jima on the far side of the bay.  Perhaps the most striking of the hundreds of Iso-Teien lantern designs is the monolithic Lion Lantern, which sits near the restored villa  at the top of an outcropping of natural stone silhouetted against the bay.”  Kinkade explains that the “roof” of this lantern alone measured at least 6 x 10 feet!
         Kinkade says that he is looking forward to a return exploration of this land and culture.  “I draw design elements into our projects almost every day that are influenced by what I saw and experienced in Japan.  And yes, the National Sculptors’ Guild Garden has seen some [inspired] changes as well.”
        ____________________________________________________________________________________
        So here we are today, continuing to carve stone lanterns, from classic to contemporary.  The integrity of granite gives Stone Forest carvings a material presence not realized using man-made materials such as cement or cast stone, making our pieces a timeless investment to be cherished and passed down for years to come.  Since each piece is hand carved using hammer and chisel, the individual character of the rock as well as the inspiration of the stone cutter lend each sculpture a unique quality.  Collected by enthusiasts, botanical gardens, and U.S. Japanese Gardens, our traditional Japanese stone lanterns are made to exacting Japanese specifications, and can be custom-carved in any style at your request.

        “We still carve some designs from our original collection from over 20 years ago,” says owner Michael Zimber.  “One of our unifying themes is that we work with all natural materials.  The other is ‘less is more’.  We want to emphasize the underlying natural materials over the design.”

        Picture a small, dirt yard brimming with traditional Japanese hand-carved granite lanterns in Santa Fe, New Mexico in the year 1989.  Picture the owner of this small business, who has just returned from a life-changing trip to Japan, and who envisions a show-stopping, landscaped garden gallery full of running fountains, lanterns, water basins, benches and a koy pond, complete with blooming water lilies and a granite bridge.

        ____________________________________________________________________________________
         
        Sources |
        Itoh, Teiji. Space and Illusion in the Japanese Garden. John Weatherhill, Inc: © 1973.  “To Capture with a Stone Lantern.”  Pgs 54-56.
        Kinkade, John.  Owner of Columbine Gallery in Loveland, CO | Executive Director of the National Sculptor’s Guild.  Written interview.
        Parkes, Carl/FriskoDude of San Francisco, CA.  Source for image:  http://www.flickr.com/photos/friskodude/1188078/.  Further information: http://friskodude.blogspot.com/
        Roth, Douglas M.  Sukiya Living Magazine, The Journal of Japanese Gardening.  © 2010.  March/April issue, No. 74.  “Why JGardens Aren’t Lit…and why we don’t put bulbs in stone lanterns.”  Pgs 20-27.
        Roth, Douglas M.  Sukiya Living Magazine, The Journal of Japanese Gardening.  © 2009.  November/December issue, No. 72.  “Yukimi Placement.”  Pgs 18-19.
        Roth, Douglas M.  Sukiya Living Magazine, The Journal of Japanese Gardening.  © 2008.  September/October issue, No. 65.  “Lantern Assembly.”  Pg 21.
        Seike, Kiyoshi, Masanobu Kudo and David H. Engel.  A Japanese Touch for Your Garden. Kodansha International Ltd: © 2008.  “Stone Lanterns and More: The Legacy of Tea.”  Pgs 54-59.
        Wikipedia: The Free Encyclopedia.  http://en.wikipedia.org/wiki/Wabi-sabi